Skip to content Skip to sidebar Skip to footer

Yearly Archives: 2025

a construction roofer

What Are Construction Roofers Called? Understanding Roofing Roles in New Jersey

When it comes to construction in New Jersey, the roof is more than just a finishing touch—it’s a critical component of a building’s integrity and energy efficiency. Yet many people still ask, “What are construction roofers called?” It’s a simple question with layers of nuance, especially in a highly regulated and professionally diverse state like New Jersey.

a construction roofer

With Charles Jimerson of CJ Commercial Roofing NJ, we’ll unpack that question, explore different roofing job titles, and examine their responsibilities. Along the way, we’ll tie in relevant industry terms, location-specific insights, and key related concepts (LSI keywords) such as roofing contractors, licensed roofers, shingle installers, commercial roofing specialists, and union roofers in New Jersey.

🏗️ What Are Construction Roofers Called?

In the construction industry, those who specialize in installing, repairing, and maintaining roofs are commonly referred to as roofers. However, this is a broad term. The more accurate and industry-specific titles include:

  • Roofing Contractor
  • Roofing Technician
  • Journeyman Roofer
  • Shingle Installer
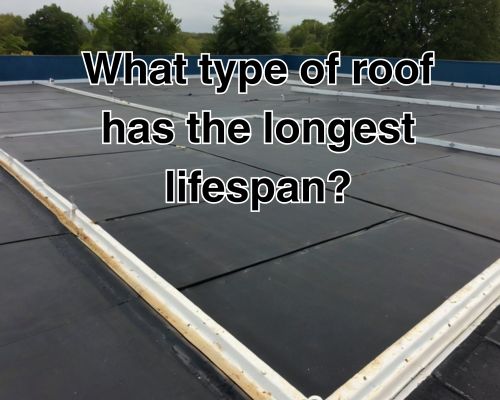
  • Flat Roof Specialist
  • Commercial Roofer
  • Residential Roofer
  • Union Roofer (particularly in New Jersey)
  • Apprentice Roofer (entry-level position)
  • Lead Roofer or Foreman Roofer (supervisory role)

Each title reflects a different skill level, specialization, or role within a roofing project. In many parts of the U.S., especially states like New Jersey, the title “roofing contractor” is legally recognized and often licensed separately from general contractors.

🧱 Roofing Roles and Responsibilities

Whether on a suburban home in Edison or a commercial structure in Jersey City, roofers are responsible for the proper installation and long-term durability of the roofing system. Their daily tasks include:

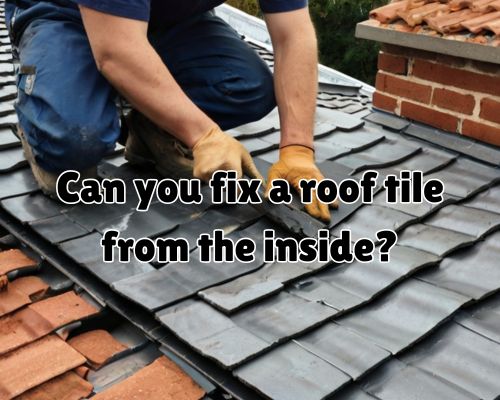
  • Measuring and cutting roofing materials (like asphalt shingles, slate, or metal)
  • Installing underlayment, flashing, and weatherproof barriers
  • Repairing damaged areas and replacing aging materials
  • Ensuring proper drainage and venting systems
  • Following local New Jersey building codes and OSHA safety standards

Specialist roofers might focus on particular systems, such as:

  • EPDM, TPO, or PVC flat roofing (commonly used in commercial buildings in Newark and Trenton)
  • Cedar shakes and asphalt shingles (popular in residential neighborhoods like Morristown or Cherry Hill)
  • Metal roofing (growing in energy-efficient homes throughout New Jersey)

🧾 Are Roofing Contractors the Same as Roofers?

This is a common point of confusion. All roofing contractors are roofers, but not all roofers are contractors.

  • A roofer is someone who physically performs the work—cutting shingles, applying tar, or sealing seams.
  • A roofing contractor, on the other hand, typically manages the job and holds the necessary licensing and insurance to legally operate a roofing business in New Jersey.

In many New Jersey municipalities, such as Paterson or Atlantic City, roofing contractors are required to register with the New Jersey Division of Consumer Affairs, carry liability insurance, and follow zoning and permitting rules.

🏙️ Roofing in New Jersey: A Local Perspective

The demand for qualified roofing professionals in New Jersey is on the rise. With the state’s blend of historic architecture and coastal exposure, roofing projects require both precision and regional knowledge.

✅ Common Roofing Materials in NJ:

  • Asphalt shingles (affordable and easy to replace)
  • Flat membrane systems (in cities like Camden and Hoboken)
  • Metal roofing (increasing in sustainable homes)
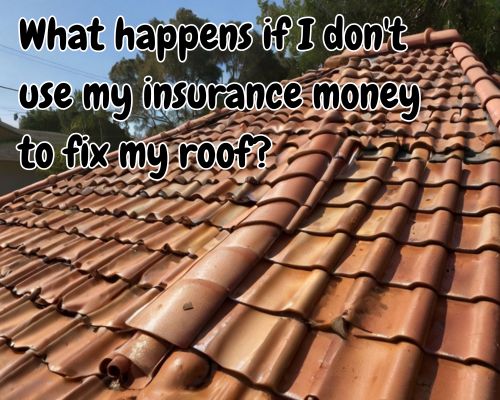
  • Slate or tile roofing (seen in historic homes around Princeton or Montclair)

✅ Local Roofing Licenses and Labor:

  • Union Roofers Local 10, based in Newark, is part of the United Union of Roofers, Waterproofers & Allied Workers.
  • Many major roofing projects in urban areas like Jersey City are staffed by union-certified journeymen and apprentice roofers.

💼 Types of Construction Roofers in New Jersey

Let’s break down the common types of construction roofers found throughout New Jersey:

1. Residential Roofers

These professionals focus on homes and small structures. You’ll see them working on pitched roofs in places like Toms River or Summit. They often work with asphalt shingles, wood shakes, or synthetic tiles.

2. Commercial Roofers

Handling larger-scale projects, these roofers are trained in flat-roof systems and are often employed by roofing companies in Newark, Elizabeth, or Parsippany. They must understand thermal insulation, drainage systems, and commercial safety codes.

3. Industrial Roofers

These roofers work on warehouses, factories, and government buildings. You might find them working on metal seam systems or solar-integrated roofing in areas like Linden or Woodbridge.

4. Repair and Maintenance Roofers

These professionals are often called in post-storm or during seasonal maintenance cycles. After Nor’easters or heavy snowfalls common in New Jersey winters, roofers specializing in emergency leak repair are in high demand.

💡 SEO-Integrated Insight: Roofing Jobs and Titles

To further optimize this article, it’s worth noting some search engine optimized variations of the focus keyword:

  • “What do you call someone who works on roofs?”
  • “Different types of roofing contractors”
  • “Certified roofer in New Jersey”
  • “Union roofer job titles”
  • “New Jersey roofing specialist license”
  • “Journeyman vs apprentice roofer in NJ”

Including these LSI keywords and semantic variants ensures that this content captures a wide range of search queries, appealing to local users, homeowners, and industry professionals alike.

🧠 How to Choose the Right Roofer in New Jersey

If you’re hiring a roofer in the Garden State, ask these questions:

  1. Are you licensed in New Jersey?
  2. Do you carry liability and worker’s compensation insurance?
  3. What roofing systems are you certified to install?
  4. Do you belong to any trade unions or associations like NRCA?
  5. Can you provide recent references from Bergen County or Monmouth County?

For more, visit CJ Commercial Roofing NJ.

📈 Final Thoughts: Beyond the Label

So, what are construction roofers called?

They’re more than just “roofers.” They’re skilled tradespeople with specialized knowledge, whether labeled as licensed roofing contractors, union journeymen, commercial specialists, or residential technicians. And in New Jersey, where weather, architecture, and regulation vary from city to shore, these professionals are vital to every phase of the building process.

Whether you’re replacing shingles in Freehold or installing a TPO membrane in Atlantic City, choosing the right kind of roofing expert—and understanding what they’re called—can make all the difference in the success and longevity of your project.

Leave a comment

Properly sealed roof penetrations.

What Type of Roof Has the Longest Lifespan?

When investing in a new roof, homeowners in New Jersey often ask: “What type of roof has the longest lifespan?” It’s a valid concern, especially given the substantial financial outlay and the need to ensure long-term protection against the Garden State’s harsh winters, humid summers, and frequent coastal storms. With Charles Jimerson of CJ Commercial Roofing NJ, we’ll explore the most durable roofing options, their average lifespans, benefits, drawbacks, and why longevity matters in New Jersey’s diverse climate.

Properly sealed roof penetrations.

🏡 Why Roof Longevity Matters in New Jersey

Before diving into materials, it’s important to understand why longevity should be a priority for New Jersey property owners:

  • Harsh winters bring ice dams and snow accumulation, causing wear and tear on weaker roofing materials.
  • Humid summers and stormy weather in regions like Trenton, Newark, and Atlantic City demand resilience against water intrusion and mold growth.
  • Salt-laden air in coastal towns like Toms River and Cape May can corrode certain roof types faster than in inland areas.

A long-lasting roof not only increases property value but also reduces repair and replacement costs over time—two major factors for savvy New Jersey homeowners.

🧱 Top Roofing Materials Ranked by Lifespan

Let’s break down the top contenders for the most durable roofing materials available in New Jersey, focusing on their lifespan, maintenance, cost, and local suitability.

1. Slate Roofing (🏆 Longevity Leader)

  • Lifespan: 75 to 100+ years
  • LSI Keywords: natural stone roof, high-end roofing, historic home roofing
  • Best for: Colonial-style homes, luxury estates in places like Princeton and Morristown

Slate roofs are the undisputed champions of durability. Made from natural stone, they’re fire-resistant, weatherproof, and nearly impervious to pests or mold. Slate is ideal for areas that experience frequent freeze-thaw cycles, making it particularly well-suited to Northern NJ locales.

However, it’s heavy, requiring reinforced framing, and the installation cost is among the highest—averaging $15 to $30 per square foot in New Jersey. Still, for long-term investment, it’s hard to beat.

2. Clay and Concrete Tiles

  • Lifespan: 50 to 100 years
  • LSI Keywords: terracotta roof, Spanish tile, heat-resistant roofing
  • Common in: Custom builds and Mediterranean-style homes in affluent NJ suburbs

Though more popular in warmer states, clay tiles are gaining traction in New Jersey for their resilience and energy efficiency. They resist rot and insect damage, and concrete variants offer similar longevity at a lower price point.

However, like slate, they’re heavy and require expert installation. They’re best for homes with proper support structures and where aesthetics are paramount.

3. Metal Roofing (Standing Seam or Aluminum)

  • Lifespan: 40 to 70 years
  • LSI Keywords: standing seam, aluminum roofing, energy-efficient roof
  • Ideal for: Modern farmhouses and energy-efficient homes across NJ

Metal roofs are gaining ground in rural and suburban New Jersey, particularly in counties like Hunterdon and Somerset, due to their longevity, eco-friendliness, and resistance to fire and wind. Standing seam metal roofing offers sleek aesthetics and water-tight seams.

Metal also performs well in snowy regions thanks to its ability to shed snow quickly—reducing the load on your structure. Costs range from $8 to $14 per square foot installed.

4. Composite (Synthetic) Shingles

  • Lifespan: 30 to 50 years
  • LSI Keywords: synthetic slate, polymer roofing, impact-resistant roof
  • Great for: Homeowners wanting the look of slate or shake without the cost

Composite shingles mimic higher-end materials like cedar or slate but are made from polymer blends. Many brands come with Class 4 impact resistance, ideal for hail-prone areas in Western NJ.

These roofs provide excellent durability without the structural demands of slate or clay. And while they’re more expensive than asphalt, they tend to last twice as long.

5. Architectural Asphalt Shingles (Premium Grade)

  • Lifespan: 30 to 40 years
  • LSI Keywords: laminated shingles, dimensional asphalt, fiberglass roof
  • Common in: Suburban developments in Edison, Cherry Hill, and Woodbridge

Architectural shingles are a higher-end version of the standard asphalt shingle. They feature multiple layers for increased durability and come with longer warranties—many offering 30-year or limited lifetime coverage.

They strike a balance between affordability and performance, especially with advanced algae-resistant and UV-reflective coatings suited to humid and sunny areas of South Jersey.

📊 Comparison Table: Roof Types by Lifespan & Suitability in New Jersey

Roof TypeAverage LifespanMaintenanceNJ SuitabilityCost (Installed/Sq.Ft.)
Slate75–100+ yearsLowNorth/Central NJ$15–$30
Clay/Concrete Tile50–100 yearsLowCoastal/Suburban$10–$25
Metal (Standing Seam)40–70 yearsLow–MediumStatewide$8–$14
Composite Shingles30–50 yearsLowSuburban/Rural$7–$12
Architectural Asphalt30–40 yearsMediumStatewide$5–$10

🧰 Tips to Extend the Life of Your Roof in New Jersey

No matter what type of roof you choose, regular roof maintenance is critical to maximizing its lifespan:

  • Annual inspections to spot small leaks or damage early
  • Gutter cleaning, especially during fall foliage season
  • Ice dam prevention in the winter using attic insulation and proper ventilation
  • Tree trimming to prevent debris and reduce storm damage
  • Moss and algae treatments, particularly in shaded areas common in older towns like Montclair

Consider hiring a certified roofing contractor in New Jersey like CJ Commercial Roofing NJ who understands local code requirements and weather challenges. Look for certifications from GAF, CertainTeed, or Owens Corning, all reputable manufacturers with strong presence in the region.

📍 Local Insight: Roofing Trends in New Jersey

  • In Jersey Shore towns, metal and composite roofing are popular due to wind and salt resistance.
  • In historic neighborhoods like Lambertville, slate and synthetic slate help preserve visual authenticity.
  • In urban centers like Newark and Paterson, flat commercial roofs often use modified bitumen or TPO—less about longevity, more about affordability and insulation.

Many New Jersey roofing companies now offer eco-friendly and solar-integrated roofing systems, which can increase resale value and appeal to energy-conscious buyers.

✅ Final Verdict: What Roof Lasts the Longest?

If you’re looking purely for maximum longevity, slate roofing is the reigning champ—lasting over a century with minimal upkeep. However, if you want a long-lasting, lower-cost alternative better suited to modern homes, metal and composite roofing offer an excellent balance of durability, cost-efficiency, and energy performance.

💬 Call to Action

Thinking about a roof that can withstand New Jersey’s wild winters and muggy summers for decades to come? Talk to a licensed local roofer to assess your home’s structural needs, budget, and aesthetic preferences. Don’t just go by what lasts the longest—choose the roof that lasts the longest for you.

🔎 Want more guidance? Explore top-rated roofing contractors in your area by searching:
“long-lasting roofing installers near me in New Jersey” or “best roofing materials for NJ climate”.

Leave a comment

roof tiles for fixing

What Happens If I Don’t Use My Insurance Money to Fix My Roof? (New Jersey Guide)

Homeowners in New Jersey are no strangers to unpredictable weather—be it heavy snow, nor’easters, hailstorms, or high winds. Roofing damage is one of the most common reasons homeowners file insurance claims. But what if, after receiving the payout, you decide not to use the insurance money to fix your roof? Is that legal? What are the consequences?

roof tiles for fixing

With Charles Jimerson of CJ Commercial Roofing NJ, let’s break down the risks, legal implications, and homeowner responsibilities surrounding this increasingly common dilemma in New Jersey.

Understanding Roof Insurance Claims in New Jersey

When you file a roof damage claim with your homeowners insurance provider in New Jersey—be it after wind damage in Cherry Hill or hailstorms in Morris County—you typically receive a settlement check after an inspection by an adjuster. This payment may be based on the actual cash value (ACV) or the replacement cost value (RCV) of your roof.

Common Reasons for Roof Claims:

  • Wind damage from tropical storms or hurricanes
  • Ice dams and snow-related structural issues
  • Tree falls or branch impact
  • Hail damage
  • Fire or other sudden events

📌 Salient Entity Insight: In New Jersey, insurance providers like State Farm, Allstate, and NJM commonly handle thousands of roofing claims annually due to coastal and seasonal weather threats.

The Question: What Happens If You Don’t Use the Insurance Money?

Let’s get to the heart of the matter. If you receive a check from your insurer but choose not to make the roof repairs, you may be legally allowed to do so—but it’s not without consequences.

1. Your Insurance Company May Not Reinsure Damage

If you skip repairs and later file another claim for the same roof (e.g., more leaks or structural issues), your insurance company can deny coverage. Why? Because the initial damage was never fixed.

📢 Local Tip: In New Jersey, insurers often keep a claim history on file and may include a stipulation that repairs must be completed within a set timeframe—often 6–12 months.

2. You Risk Policy Cancellation or Premium Hikes

Insurance companies reserve the right to cancel or non-renew your policy if you neglect necessary repairs. In New Jersey, underwriters may conduct periodic home inspections—especially for homes over 20 years old. An unrepaired roof is a red flag for elevated risk.

🔍 LSI Keyword Link: “Homeowners insurance cancellation NJ,” “roof condition and insurance,” “insurance inspections in New Jersey.”

3. It Could Be Considered Insurance Fraud (In Some Cases)

If you misrepresent your intention to repair the roof or submit false invoices, this can be deemed insurance fraud—a serious crime in New Jersey. Simply pocketing the money isn’t illegal per se, but deceiving the insurer certainly is.

⚖️ Legal Context in NJ: New Jersey law (N.J.S.A. 2C:21-4.6) classifies insurance fraud as a felony, punishable by fines or jail time.

4. Future Claims May Be Depreciated

If your policy uses actual cash value (ACV) rather than replacement cost value (RCV), and you don’t show proof of repair, future claims may be paid at even lower values due to compounded depreciation. Your roof is worth less if you let it age without fixing it.

5. Your Mortgage Lender May Intervene

In many cases, especially with newer mortgages, the insurance check is made out to both the homeowner and the mortgage lender (e.g., Wells Fargo, Chase, or local New Jersey banks). That means the lender has a say in what happens next.

  • They may require you to prove repairs are underway before endorsing the check.
  • Some even hold funds in escrow and release them in phases as work is completed.

🏦 LSI Connection: “insurance check mortgage endorsement,” “escrow roofing funds NJ,” “mortgage holder insurance rights.”

Why Homeowners Delay or Skip Roof Repairs

Common Reasons in NJ:

  • DIY Repairs: Some homeowners in New Brunswick or Trenton may choose to fix small leaks themselves.
  • Financial Priorities: The insurance payout may seem more useful for urgent debts or living expenses.
  • Selling the Home: Some opt to sell the home “as is” without repairing the roof—sometimes disclosing the insurance claim, sometimes not.

⚠️ Caution: Failing to disclose an outstanding insurance claim during the sale could open you to legal liability.

Ethical and Practical Alternatives

1. Repair Now, Upgrade Later

If you received a replacement-cost payout, consider using the funds to make the minimum necessary repairs now and save for a full upgrade later. That way, you’re compliant and avoid future problems.

2. Negotiate the Scope of Work

Roofing contractors in NJ often work with homeowners to maximize insurance budgets. Reputable companies in Newark, Princeton, or Ocean County will even assist with claim documentation and invoicing.

3. Request a Reinspection or Supplement

If you believe the insurance estimate was low, you can request a reinspection. Many New Jersey roofing companies offer free inspections to provide a second opinion.

Choosing the Right Roofing Contractor in New Jersey

It’s essential to work with a licensed and insured roofing company like CJ Commercial Roofing NJ in NJ who:

  • Has experience handling insurance claims
  • Provides itemized, detailed quotes
  • Works with your mortgage provider if needed
  • Complies with local codes (e.g., NJ Uniform Construction Code)

📍 Local Mention: Companies in areas like Edison, Jersey City, or the Shore region often specialize in storm damage repair and understand both municipal permitting and insurance documentation.

Final Thoughts: Play It Smart with Your Roof Insurance Payout

To circle back to the focus keyword—what happens if I don’t use my insurance money to fix my roof?—the short answer is: you risk future coverage, financial penalties, and possibly legal trouble.

While it’s tempting to treat the payout like a windfall, smart homeowners in New Jersey treat it like a safety net. Fixing your roof now protects your property value, your wallet, and your peace of mind during the next big storm.

Key Takeaways

  • Using insurance money for something other than roof repair can jeopardize future claims, premiums, or even your policy.
  • In New Jersey, insurers often require proof of repairs—especially after weather-related claims.
  • Unrepaired roofs can impact resale value and mortgage compliance.
  • Always consult with a licensed NJ roofer and your insurance agent before making final decisions.

Leave a comment

fixing a roof from the outside

Can You Fix a Roof Tile From the Inside? A West Palm Beach Homeowner’s Guide

When it comes to roofing problems, especially in coastal regions like West Palm Beach, Florida, one question often comes up among homeowners: Can you fix a roof tile from the inside? It’s a fair query, especially for those hoping to avoid climbing onto a potentially slippery, sloped surface in Florida’s hot, humid, and storm-prone environment. The short answer? No, not effectively. But there’s more nuance, and with Star Roofing, we will walk you through everything you need to know—from structural insights to costs and alternatives.

fixing a roof from the outside

Understanding the Structure of a Tiled Roof

To appreciate why roof tiles can’t realistically be fixed from inside your attic or ceiling cavity, it’s helpful to understand how a tile roof is constructed. A typical tile roof system consists of several layers:

  • Roof deck (usually plywood)
  • Underlayment (such as roofing felt or synthetic barrier)
  • Batten system (wood strips where tiles are anchored)
  • Concrete or clay roof tiles

In a tile roof, tiles are the first line of defense against the elements. They’re designed to shed water, not seal it out entirely. The underlayment plays the key waterproofing role. Therefore, once a tile is cracked or missing, water intrusion becomes likely—especially in subtropical climates like West Palm Beach, where sudden downpours and hurricanes are part of life.

Can You Access and Repair the Tile from the Inside?

Technically? You might access the underside of a tile from your attic—if there’s a leak.
Realistically? You can only treat the symptom, not the root cause.

From the inside, you may observe signs of damage like:

  • Water dripping through the roof deck
  • Mold or mildew on attic insulation
  • Light peeking through small gaps

Some homeowners attempt temporary interior fixes with sealants or roof patch spray foams, but these are short-term solutions at best. They don’t restore the tile’s integrity or stop future leaks. Even worse, ignoring proper repair can lead to rot, pest infestations, and even compromised structural integrity.

Why Professional Exterior Repairs Are Essential

To properly fix a tile roof in West Palm Beach, exterior access is essential. Local roofing professionals understand the tile interlocking system and can:

  • Replace individual broken tiles
  • Check for underlayment damage
  • Re-seal battens and flashing
  • Ensure hurricane resilience (per Florida Building Code)

Attempting DIY work—especially in humid Florida—can void warranties or cause further damage if you disturb neighboring tiles.

Many roofing contractors in West Palm Beach like Star Roofing are certified in Miami-Dade HVHZ (High Velocity Hurricane Zone) standards, which require stringent roofing standards due to extreme weather risks. Any proper tile roof repair should meet or exceed those guidelines.

Local Climate Makes Exterior Repair Even More Crucial

West Palm Beach’s climate plays a pivotal role in roofing strategy. With average annual rainfall topping 63 inches and hurricane threats between June and November, waterproofing integrity is everything. A damaged tile—even a hairline crack—can let in moisture that causes damage in the hot, poorly ventilated attic spaces common in Florida homes.

Because tile roofs are popular in Palm Beach County for their heat resistance and aesthetic appeal, it’s vital to preserve both function and curb appeal with visible, exterior repairs—not interior stopgaps.

Alternatives to Consider While Waiting for Repairs

If a storm hits and immediate outdoor repair isn’t safe or feasible, you can take some temporary indoor measures to minimize damage:

  • Tarping from the inside (though less effective than exterior tarping)
  • Placing catch buckets or moisture barriers
  • Dehumidifiers to prevent mold growth
  • Roofing tape or sealant spray for very short-term mitigation

However, don’t rely on these as solutions. Think of them as band-aids until a licensed West Palm Beach roofer can inspect and properly address the damage.

Common Reasons Roof Tiles Crack in West Palm Beach

Understanding why tiles crack helps prevent repeat issues. Here are some top culprits in South Florida:

  1. Thermal expansion – Scorching summer days followed by evening rain can create expansion and contraction cycles.
  2. Hurricane debris – Flying branches or roof-mounted debris can cause chips and cracks.
  3. Foot traffic – Improper pressure from walking on the roof can cause breakage, especially near the edges.
  4. Salt air corrosion – Coastal exposure can wear down underlayments and battens over time.
  5. Aging – Even tile roofs, which can last 50+ years, experience occasional tile failures after 20–30 years.

What Does It Cost to Repair a Roof Tile in West Palm Beach?

Depending on the extent of damage, West Palm Beach roof tile repairs typically cost:

  • $150 to $300 per tile replacement (including labor and disposal)
  • $300 to $750 if underlayment or battens require minor patching
  • $1000+ for broader section repairs or complex tile matching

Many West Palm Beach roofing contractors offer free inspections or flat-fee repair estimates. It’s worth comparing a few local companies like Ediss Construction, Carlisle Roofing, or Tile Roof Restoration West Palm for quotes and warranties.

Insurance Considerations for Tile Roof Repairs

Another reason not to attempt interior-only repairs: insurance claim invalidation. Many homeowner’s insurance policies in Florida require you to act promptly and correctly when roof damage occurs.

Improper or delayed repair—especially something like stuffing a leak from the attic—may result in:

  • Denied claims
  • Out-of-pocket costs
  • Higher future premiums

If your roof damage results from a covered event (like windstorm or fallen tree), professional documentation and repair work are key to a smooth claim process. West Palm Beach homeowners are encouraged to contact both a roofer and their insurer ASAP after roof issues arise.

When to Replace vs. Repair a Roof Tile

In some cases, you’ll need more than a simple repair—especially if:

  • The tile style has been discontinued
  • The underlayment is deteriorated
  • The damage has spread to multiple areas

If your tile roof is over 25–30 years old, you might consider a full roof assessment to determine cost-effectiveness. Many West Palm Beach homeowners are now transitioning to metal roofs or synthetic tile alternatives, which are more resilient against Florida’s UV and storm load.

Final Thoughts: Exterior Action Is the Only Lasting Solution

So, can you fix a roof tile from the inside? No—not in any permanent, reliable, or insurable way.
If you’re in West Palm Beach, Florida, and facing a broken roof tile, your best route is to:

  • Get a licensed roofing inspection
  • Use interior protection only for very short-term damage control
  • Prioritize code-compliant exterior repair
  • Check your home insurance coverage
  • Document everything for future maintenance or claims

Roofing issues don’t get better on their own—especially not in Florida’s demanding climate. Proactive exterior repairs, not attic patches, will protect your home’s value, your wallet, and your peace of mind.

Leave a comment

Michigan to Texas

Moving from Michigan to Texas: Complete Relocation Guide

Relocating from Michigan to Texas can be an exciting new chapter in your life. Whether you’re relocating for work, family, or a fresh start, it’s essential to plan and organize your move effectively. With the right moving services, expert tips, and a little preparation, you can make your transition to the Lone Star State smooth and stress-free. This guide will help you navigate the entire process from Michigan to Texas.

Why Professional Movers Are the Best Choice

A move from Michigan to Texas is a long-distance relocation that requires careful planning and execution. Professional movers are experts in managing the complexities of long-distance moves. They can ensure that your belongings are packed, loaded, and transported safely and securely. Choosing the right moving company can save you valuable time and effort, and reduce the chances of damage or delays.

Steps to Prepare for Your Move

Preparation is key to any successful move. Follow these steps to ensure you’re ready for your move from Michigan to Texas:

  1. Create a Moving Timeline
  2. Set a timeline that outlines every task from booking movers to unpacking at your new home. This will keep you organized and ensure that you meet critical deadlines.
  3. Declutter Before the Move
  4. The fewer items you move, the cheaper and easier it will be. Go through your home and decide what you want to keep. Donate, sell, or discard items that you no longer need.
  5. Choose the Right Moving Company
  6. Take the time to research moving companies that specialize in long-distance moves. Look for customer reviews, insurance policies, and services that meet your needs.
  7. Pack Essentials in Advance
  8. Pack a small bag with essential items you’ll need during the move, such as clothing, toiletries, and essential documents. This will ensure that you have access to everything you need without having to dig through boxes.

How to Select the Best Moving Company for Your Relocation

Michigan to Texas

Choosing the right moving company is essential for a successful and stress-free move. Here’s how to find the best movers for your relocation:

  • Look for Experience: Choose a company with experience in long-distance moves, particularly from Michigan to Texas.
  • Check Reviews and Ratings: Online reviews and ratings can provide valuable insights into the company’s reliability and customer service.
  • Verify Licensing and Insurance: Ensure the moving company is licensed and offers insurance for your belongings.
  • Request Detailed Estimates: Obtain detailed quotes from multiple moving companies to compare pricing and services.

Essential Moving Services You May Need

Moving from Michigan to Texas requires more than just loading a truck; it also involves planning and preparation. Here are some essential services to look for:

  • Packing and Unpacking: Professional movers can pack your items safely and efficiently, ensuring everything is ready for transport. They’ll also unpack at your new home.
  • Furniture Disassembly and Assembly: Movers will disassemble your furniture before the move and reassemble it upon arrival at your new location.
  • Vehicle Transport: If you need to move your car, many companies offer auto transport services to transport your vehicle from Michigan to Texas safely.
  • Temporary Storage: If you need to store your items for a short period, consider hiring a moving company that offers secure, climate-controlled storage solutions.

How Much Will It Cost to Move from Michigan to Texas?

The cost of your move will depend on several factors, including the size of your move, the services you select, and the distance. On average, relocating from Michigan to Texas can cost between $2,000 and $5,000. To manage your costs:

  • Get Multiple Quotes: Request estimates from at least three moving companies to compare prices and services.
  • Move During Off-Peak Times: Rates tend to be lower in the fall and winter when moving companies are less busy.
  • Pack Some Items Yourself: Save money by packing some of your belongings yourself rather than opting for complete packing services.

What to Expect on Moving Day

The big day is finally here! To ensure everything goes smoothly, here’s what you can expect:

  • Arrival of Movers: Movers will arrive at your home to start packing and loading your belongings. Be ready to answer any questions they may have about specific instructions.
  • Loading Process: Movers will carefully load your items onto the truck. Ensure that everything is securely packed and handled with care.
  • Final Walkthrough: Before the movers leave, do a final walkthrough of your home to ensure nothing has been left behind.

Frequently Asked Questions (FAQs)

1. How long does a move from Michigan to Texas take?

Typically, the move will take about 4 to 7 days, depending on the specific locations and the moving company’s schedule.

2. Should I pack everything myself?

Many moving companies offer complete packing services, but if you prefer, you can pack your belongings yourself. This can save money, but you’ll need to ensure everything is packed safely.

3. Can I track my belongings during the move?

Yes, many moving companies offer tracking services, allowing you to follow the progress of your items during the move.

4. What if something gets damaged during the move?

Make sure your moving company offers insurance coverage. If damage occurs, file a claim with the company to receive compensation.

5. How can I reduce the cost of my move?

To save money, consider moving during the off-peak season, packing some items yourself, and decluttering before the move.

Michigan to Texas

Moving from Michigan to Texas doesn’t have to be overwhelming. By preparing in advance, hiring the right moving company, and following the tips in this guide, you can ensure a smooth and efficient relocation. The key to a stress-free move is planning, organization, and choosing the right professional help. Soon, you’ll be enjoying your new life in Texas!

Buzzmoving matches you with trusted movers nationwide, offering expert, personalized moving services. Get a free quote today and enjoy support every step of the way.

Leave a comment

Reliable and Efficient North Carolina Auto Transport Services for Your Vehicle

Auto Transport Services Available in North Carolina

North Carolina Auto Transport plays an essential role for residents, businesses, and military personnel who need to move vehicles safely and efficiently within the state or across the country. Whether you’re relocating, buying a car online, or sending a vehicle to a family member, professional auto transport services in North Carolina ensure your vehicle reaches its destination in perfect condition without the stress of driving it yourself.

Why Choose North Carolina Auto Transport?

Moving a vehicle across state lines or even within the state can be a complicated and time-consuming process. Choosing a trusted North Carolina auto transport company simplifies this task, offering several benefits. First, professional transporters have experience navigating the legal and logistical challenges of vehicle shipping, including permits, insurance, and regulations.

Types of Auto Transport Services Available in North Carolina

North Carolina’s diverse terrain and wide range of customer needs mean that auto transport providers offer various service options to fit different budgets and preferences:

  • Open Auto Transport: The most common and cost-effective method, open transport involves carrying vehicles on an open-air trailer. While it exposes the vehicle to weather and road conditions, it’s safe for most standard vehicles and widely used for its affordability.
  • Enclosed Auto Transport: For owners of luxury cars, classic vehicles, or motorcycles, enclosed transport offers enhanced protection by shielding the vehicle from external elements like rain, dust, and debris. Although this service costs more, it provides peace of mind for high-value automobiles.
  • Door to Door Transport: This convenient service involves picking up and delivering your vehicle as close to your specified locations as possible, minimizing the hassle of traveling to terminals.
  • Terminal to Terminal Transport: A budget-friendly alternative where you drop off and pick up your vehicle at designated terminals. While less convenient, it often reduces shipping costs.
The Process of Shipping a Vehicle in North Carolina

The Process of Shipping a Vehicle in North Carolina

The auto transport process in North Carolina typically starts with requesting a quote from multiple carriers to compare prices and services. After selecting a company, you’ll schedule pickup, during which a driver inspects the vehicle to document its current condition.

Once the vehicle is loaded securely onto the carrier, it begins its journey to the destination. The delivery driver will coordinate a drop-off time, and upon delivery, you’ll inspect the vehicle again to ensure it arrived without damage.

Common Routes and Destinations from North Carolina

Due to its strategic location along the East Coast, North Carolina serves as a central hub for vehicle transport to various popular destinations. Common routes include shipments to and from major cities like Charlotte, Raleigh, Durham, and Wilmington.

Tips for Choosing the Right North Carolina Auto Transport Company

To ensure your vehicle transport experience is smooth and worry-free, consider the following tips when selecting a company:

  • Verify Licensing and Insurance: Confirm that the company is registered with the Department of Transportation and carries sufficient insurance coverage.
  • Read Customer Reviews: Research online testimonials and ratings to understand the company’s reputation.
  • Request Detailed Quotes: Ensure the price includes all fees and understand the terms regarding delivery timelines and cancellations.
  • Understand the Insurance Policy: Know what is covered in case of damage and how claims are handled.
  • Ask About Vehicle Preparation: Follow recommended steps like cleaning your vehicle, removing personal items, and checking for leaks to avoid issues during transport.
Professional Auto Transport Services in North Carolina

Benefits of Using Professional Auto Transport Services in North Carolina

Opting for professional auto transport in North Carolina offers several advantages:

  • Safety and Security: Your vehicle is handled by trained drivers using specialized equipment designed to protect your car during transit.
  • Time and Cost Savings: Avoid the costs associated with driving long distances yourself, including fuel, lodging, and potential wear and tear.
  • Convenience: Door-to-door services save you from coordinating pickups and drop-offs on your own.
  • Peace of Mind: Knowing your vehicle is insured and transported by experts reduces stress, especially during a hectic move.

Final Thoughts

North Carolina Auto Transport services provide a practical, safe, and cost-effective solution for vehicle relocation needs. Whether you’re moving to a new city, purchasing a car online, or deploying with the military, partnering with a reliable auto transport company ensures your vehicle arrives on time and in great condition. By understanding the options available and choosing a reputable transporter, you can simplify your move and focus on what matters most settling into your new chapter with confidence.

Affordable Auto Transport North Carolina

Leave a comment

a water cylinder after repair

How to check if a hot water cylinder is working?

For homeowners in Warragul, Victoria, understanding how to check if a hot water cylinder is working can save you time, money, and a freezing morning shower. In a town known for its crisp winters and rapidly changing temperatures, ensuring your hot water system operates correctly is not a luxury—it’s a necessity.

a water cylinder after repair

This guide explores step-by-step how to inspect your hot water cylinder, detect signs of failure, and determine whether you need professional help from a plumber in Warragul or nearby areas like Drouin, Yarragon, or Moe.

🔧 Understanding Your Hot Water Cylinder

A hot water cylinder (also referred to as a storage hot water system) is common in many Warragul homes. It stores pre-heated water, ready for use. These systems can be electric, gas, or solar-powered with electric or gas boosters.

🔎 Common Types in Warragul:

  • Mains pressure storage systems
  • Gravity-fed tanks
  • Solar hot water cylinders with electric boosters
  • Instant gas systems with small storage tanks

Given the mix of old and modern homes in the Baw Baw Shire, it’s important to know which type of system you have before troubleshooting.

✅ Step-by-Step Guide: How to Check If Your Hot Water Cylinder Is Working

1. Check for Obvious Signs

Start with a basic visual and functional check:

  • Is hot water flowing from your taps?
  • Is the cylinder warm to the touch?
  • Are there any strange sounds (like hissing, bubbling, or banging)?
  • Is water leaking from the tank or the pressure relief valve?

If the water is cold or the unit is leaking, that’s your first clue that something isn’t working properly.

2. Check the Power or Gas Supply

Depending on your system type:

  • Electric units: Ensure the circuit breaker hasn’t tripped. Check the fuse box (common in older homes in Warragul).
  • Gas systems: Verify that the pilot light is on. If not, try relighting it according to the manufacturer’s guide.
  • Solar units: Check if the booster (electric or gas) is switched on, especially during cloudy weeks in Gippsland.

💡 Tip: In colder regions like Warragul, frost protection may impact solar hot water performance during winter months.

3. Test the Thermostat and Element

For electric storage systems:

  • The thermostat may be faulty or set too low. Water should be stored at a minimum of 60°C to prevent Legionella bacteria growth.
  • The heating element could be burned out, especially in older systems (common in older Warragul properties).

A licensed electrician or licensed plumber can test these with a multimeter.

4. Inspect the Pressure Relief Valve (PRV)

Lift the TPR (Temperature Pressure Relief) valve lever:

  • You should see a burst of hot water discharge briefly.
  • If nothing comes out, the valve could be blocked or the tank isn’t heating at all.

Be cautious—this water can be extremely hot.

5. Look at the Water Temperature and Flow

  • Is the hot water lukewarm or running out quickly?
  • Does it fluctuate in temperature?

This may indicate:

  • Sediment build-up inside the tank (especially in areas with hard water like Warragul),
  • Faulty mixing valve,
  • Or a partially failed heating element.

🔥 Signs Your Hot Water Cylinder Needs Repairs or Replacement

Some symptoms indicate a larger issue that may require immediate attention from a licensed Warragul hot water plumber:

SymptomPossible Cause
No hot water at allFailed heating element, thermostat, or power supply
Rusty or discoloured waterCorrosion in the tank
Popping or rumbling noisesSediment build-up
Water leaksFaulty valve, rusted cylinder, or cracked seals
Inconsistent water temperatureFailing thermostat or valve

🧰 Tools You May Need to Diagnose Your Hot Water Cylinder

  • Multimeter (for electric checks)
  • Thermometer (to test outlet temp)
  • Flashlight (for tight spaces)
  • Owner’s manual
  • Adjustable wrench (for basic valve checks)

Note: DIY inspections are fine for basic checks, but gas and electrical components must legally be handled by licensed tradespeople in Victoria.

🧑‍🔧 When to Call a Plumber in Warragul

If you’ve walked through all the steps and still don’t have reliable hot water, it’s time to call a licensed plumber in Warragul. Local professionals can perform detailed diagnostics and carry out compliant repairs—especially vital for gas or solar units.

Trusted service providers in the Warragul area often cover:

  • Bunyip
  • Drouin
  • Longwarry
  • Trafalgar
  • Moe

Look for someone experienced with brands like Rheem, Rinnai, Bosch, and Dux, which are commonly installed across Gippsland.

💡 Hot Water Cylinder Maintenance Tips for Warragul Residents

To avoid unexpected breakdowns:

  • Flush your tank annually to remove sediment (especially if on bore or hard water).
  • Inspect anode rods every 3–5 years (prevents corrosion).
  • Test TPR valves every 6 months.
  • Check for insulation around the tank and pipes to improve efficiency.

In colder towns like Warragul, this ensures your water stays hotter for longer and your system doesn’t overwork itself.

🌱 Consider Upgrading to an Energy-Efficient Option

With the Victorian Government offering rebates for solar hot water systems, many Warragul homeowners are replacing old electric cylinders with solar or heat pump water heaters. Not only can this reduce energy costs by up to 60%, but it’s also a step toward sustainable living.

📍 Why Local Context Matters

In Warragul, hot water cylinders can be impacted by:

  • Cooler winters, which stress systems, especially older tanks.
  • Water hardness, contributing to faster sediment build-up.
  • Stormy spring weather, occasionally affecting solar booster reliability.

Having a local plumber who understands these regional issues is invaluable.

🚿 Final Thoughts: Stay Warm and Informed

Knowing how to check if your hot water cylinder is working puts you ahead of the curve. With a few simple checks, Warragul residents can identify minor problems before they become expensive repairs. If you’re unsure, reach out to a local hot water professional for peace of mind.

Don’t wait until your morning shower turns icy cold—inspect your system today and keep your home running smoothly.

📞 Need Help Now?

If you’re in Warragul or surrounding areas and facing hot water issues, contact your local licensed plumbing specialist for an assessment. Prompt service can restore your hot water quickly—and safely.

Leave a comment

a new hot water system in Australia

How Much Does a New Hot Water System Cost in Australia? | Warragul Homeowners Guide

When it’s time to replace or install a new hot water system, the first question homeowners in Warragul often ask is: “How much does a new hot water system cost in Australia?” With energy efficiency, reliability, and household size all playing major roles in your decision, understanding the true costs—both upfront and long-term—is essential. This article breaks down the pricing, types, and key considerations so you can make an informed choice.

a new hot water system in Australia

Average Cost of a New Hot Water System in Australia

In 2025, the average cost for a new hot water system in Australia ranges from $800 to $4,000, depending on the system type, size, brand, and installation complexity. Here’s a rough price breakdown by system type:

System TypeUnit Cost (AUD)Installation Cost (AUD)Total (Approx.)
Electric Storage$800 – $1,500$400 – $800$1,200 – $2,300
Gas Storage$900 – $1,600$500 – $1,000$1,400 – $2,600
Gas Continuous Flow (Instant)$1,000 – $2,000$600 – $1,200$1,600 – $3,200
Heat Pump$2,000 – $3,500$600 – $1,000$2,600 – $4,500
Solar with Gas/Electric Boost$3,000 – $5,500$1,000 – $2,500$4,000 – $8,000

🔍 Local Note (Warragul, VIC): Prices in Warragul and the Gippsland region may vary slightly due to regional supplier availability and plumbing labour costs, which are often more competitive than metro areas like Melbourne.

What Influences Hot Water System Prices in Warragul?

1. System Type & Energy Source

Electric systems are cheaper upfront but typically cost more to run, especially with standard grid power. Gas systems are efficient, particularly instantaneous gas water heaters, which are ideal for Warragul households on natural gas supply. Heat pump and solar units have higher upfront costs but offer substantial long-term energy savings.

2. Size of the Unit

Hot water systems are sized by storage capacity or flow rate. A family of four in Warragul would typically need a 125–160L gas storage unit or a 22–26L/min continuous flow system. Choosing the right size ensures you’re not overpaying upfront or running out of hot water during peak usage.

3. Installation Complexity

Replacing a system like-for-like is typically cheaper than switching types (e.g., electric to gas or solar). Retrofitting a solar unit, for example, requires roof space, plumbing changes, and sometimes trenching for booster connections—all adding to cost.

4. Brand & Warranty

Popular brands in Australia include Rheem, Rinnai, Dux, Bosch, and Aquamax. While premium brands may cost more upfront, their longer warranties and better efficiency ratings often justify the investment.

Recommended Hot Water Systems for Warragul Homes

Due to the cooler climate and rural energy infrastructure, here are common system types and what they cost locally:

  • Gas Continuous Flow (e.g., Rinnai Infinity 26)
    Great for Warragul homes with gas connections.
    💰 Total cost: ~$2,200 – $2,800 installed
  • Electric Storage (e.g., Dux Proflo 160L)
    Suitable for smaller homes or when on a controlled load tariff.
    💰 Total cost: ~$1,500 – $2,000 installed
  • Heat Pump (e.g., Stiebel Eltron WWK 302)
    Excellent for eco-conscious households using solar PV systems.
    💰 Total cost: ~$3,200 – $4,200 installed

Additional Local Considerations in Warragul

🔧 Licensed Installation is Mandatory

Under Victorian regulations, only licensed plumber with PIC (Plumbing Industry Commission) compliance certificates can install or replace hot water systems. In Warragul, reputable plumbers such as Gippsland Plumbing Services or Baw Baw Plumbing Co. are often booked weeks in advance—plan ahead.

💡 Energy Rebates & Government Incentives

Eligible homeowners in Victoria, including those in Warragul, can access Solar Victoria’s hot water rebate, which offers up to $1,000 off heat pump or solar hot water systems, depending on household income and eligibility. Pair this with STC (Small-scale Technology Certificate) discounts and you could reduce upfront costs significantly.

Is It Worth Paying More Upfront?

✅ Yes—especially when you’re looking at heat pump or solar options, which may slash your electricity bills by up to 60% annually. For example:

  • A $4,000 solar hot water system could save you up to $500 per year on energy.
  • Over 10 years, that’s $5,000 in savings, making the system essentially free in the long term.

Hidden Costs to Factor In

When budgeting for a new hot water system in Warragul, don’t forget about:

  • Old system removal – ~$150
  • Upgrades to pipework or gas lines – $200–$600
  • Electrical upgrades or switchboard work (if required) – $300+
  • Emergency installation surcharge – up to 20% more

It’s always wise to get 2–3 quotes from local Warragul plumbers or hot water specialists to ensure you’re not overpaying.

Frequently Asked Questions (FAQs)

❓ How long do hot water systems last in Warragul?

  • Electric: 8–12 years
  • Gas: 10–15 years
  • Heat Pump: 10–12 years
  • Solar: 10–20 years (panels)

Local water quality in Warragul is moderate, which means corrosion and sediment buildup are moderate concerns. Consider yearly maintenance to extend system life.

❓ Can I DIY a hot water system replacement?

No. Victorian law requires installation to be carried out by a licensed plumber and signed off with a compliance certificate. DIY installation can void warranties, pose safety hazards, and result in fines.

❓ What’s the cheapest hot water system to run?

  • Solar hot water with gas boost: Cheapest over long-term use.
  • Heat pumps: Efficient in Warragul’s mild climate, especially when paired with solar PV.

Final Thoughts: How Much Should You Budget?

In short, if you’re asking “How much does a new hot water system cost in Australia?”—and you live in Warragul—expect to spend between $1,500 and $3,500 on average. Costs depend on system type, energy source, and installation complexity.

🧠 Pro Tip: Speak with a local plumber in Warragul who understands both the climate and your energy needs. Many offer free consultations and can help you unlock rebates that dramatically lower upfront costs.

Call to Action: Get Local Quotes Today

Thinking about upgrading or replacing your hot water system in Warragul? Now is the time to act. With energy prices rising and government rebates still available, investing in an efficient hot water solution pays off fast.

🔧 Contact a licensed Warragul plumber today for tailored advice, quotes, and expert installation.

Leave a comment

a dressed unattached to a wall

Do I Have to Attach a Dresser to a Wall? Mornington Homeowners Need to Know

Do I Have to Attach a Dresser to a Wall? Mornington Homeowners Need to Know

In Mornington, Australia—a coastal suburb known for its relaxed living and beautiful family homes—interior safety is as important as interior design. Among the common questions asked by homeowners and renters alike is: Do I have to attach a dresser to a wall?

a dressed unattached to a wall

At first glance, a dresser might seem stable and unassuming, but the truth is, these seemingly innocent furniture pieces can pose serious risks if left unanchored—especially in households with small children or pets. With Mornington Cabinet Makers, let’s have an in-depth, practical, and locally relevant exploration of whether or not you should secure your dresser to the wall and under what circumstances it’s not just advisable, but essential.

Why Securing a Dresser Matters

The Australian Competition and Consumer Commission (ACCC) has repeatedly raised concerns about furniture tip-over accidents. These incidents—often involving unanchored dressers and bookshelves—can result in serious injuries or even fatalities, particularly for children under five.

Flat-pack furniture, which is very popular in Mornington homes due to its affordability and availability from retailers like IKEA and Fantastic Furniture, is especially prone to tipping. While these pieces are engineered for simple assembly, they’re often lightweight and top-heavy—making them less stable unless wall-anchored.

Tipping Risks in Mornington Homes

Many homes in Mornington, from beachside villas to modern apartments, have hard flooring such as hardwood, laminate, or tile, which can exacerbate dresser instability. If a child pulls out drawers to climb or a pet bumps into the base, the entire unit can topple. Additionally, the region’s occasional coastal tremors, while minor, can still disturb unsecured furniture.

Are You Legally Required to Attach a Dresser to the Wall in Australia?

As of now, there is no federal law in Australia mandating that homeowners or renters anchor dressers to walls. However, product safety guidelines and the Australian Furniture Association strongly recommend it, especially for furniture over 600mm in height.

Retailers such as IKEA Australia now include anti-tip wall anchoring kits with most of their dressers and require prominent safety warnings. In fact, IKEA has run national campaigns encouraging customers in areas like Mornington and across Victoria to anchor furniture after several tragic incidents worldwide.

For landlords, it’s a grey area. Under Residential Tenancies Regulations (2021) Victoria, tenants may request modifications like wall anchors for safety. If you’re renting in Mornington, your landlord cannot unreasonably refuse a request to secure heavy furniture for child safety.

When You Should Definitely Attach a Dresser to the Wall

While not every piece needs anchoring, there are specific circumstances in Mornington homes where wall attachment is strongly advised:

1. If You Have Children or Pets

Kids naturally explore their environments, often using furniture like ladders. Unanchored dressers with multiple drawers pose a serious hazard. Pets, too, can bump or jump against unstable furniture.

2. Tall or Narrow Dressers

Tallboys, vertical dressers, and narrow drawers are more likely to tip due to a high centre of gravity. These designs, common in modern Mornington apartments, should be anchored.

3. Uneven Flooring

Some homes in Mornington, especially heritage-style properties, may have sloped floors. In such cases, a dresser can tilt slightly and gradually become unstable over time.

4. Heavily Loaded Drawers

The more you store in top drawers—especially dense items like books or electronics—the more top-heavy your unit becomes. Anchoring prevents accidents caused by unbalanced weight distribution.

How to Properly Attach a Dresser to the Wall in Mornington Homes

Whether you’re a DIY enthusiast or hiring a local handyman, anchoring a dresser can be done safely and efficiently. Here’s a step-by-step outline:

1. Use the Right Anchoring Kit

Most dressers now come with anti-tip brackets. If yours didn’t, you can purchase a universal furniture wall anchor kit from Bunnings Mornington or local hardware stores. Look for ones with steel brackets, not just plastic tethers.

2. Find a Wall Stud

Use a stud finder to locate timber framing behind your plaster wall. For Mornington Peninsula homes built post-2000, studs are usually 450mm or 600mm apart. Anchoring into a stud ensures long-term durability.

3. Drill and Secure

Drill pilot holes, attach one end of the bracket to the dresser (usually at the top back), and the other end into the wall stud. Tighten screws securely.

4. Check for Electrical Wiring

Before drilling, make sure you’re not going into walls that may house electrical wires. If unsure, it’s wise to consult a licensed local tradie in Mornington.

For professional work, visit Mornington Cabinet Makers.

Local Insights: Mornington Style Meets Safety

Mornington homeowners are known for combining laid-back aesthetics with smart practicality. Hamptons-style interiors, for example, often incorporate tall white furniture pieces that add elegance but may require anchoring. Coastal boho themes, popular in beachside homes, include reclaimed timber dressers—heavier, but still tip-prone if not properly installed.

If you’re shopping locally at Mornington’s furniture retailers, ask about built-in anchoring features or whether the dresser includes a kit. Retailers like Early Settler Mornington and Forty Winks in nearby Frankston often offer guidance for anchoring pieces in family homes.

What If You Can’t Attach to the Wall?

Renters or those in heritage homes where drilling isn’t an option can still take steps to stabilise a dresser:

  • Anti-tip straps with adhesive mounts (less reliable but better than nothing)
  • L-brackets attached to skirting boards (with landlord permission)
  • Placing heavy items in bottom drawers to lower the centre of gravity
  • Using furniture gripper pads to prevent sliding

Final Thoughts: Safety Over Style

So, do you have to attach a dresser to a wall? Technically, no—but if you’re living in Mornington or anywhere on the Peninsula, it’s a best-practice choice.

With a rising focus on childproofing furniture and smart home safety, anchoring your dresser adds peace of mind and protects what matters most. Whether you’re styling a coastal-themed master bedroom or furnishing a nursery in Mount Martha, don’t overlook safety in pursuit of style.

Remember:

  • Anchor if it’s tall, narrow, or top-heavy.
  • Always use wall studs.
  • Prioritise safety—especially for kids and pets.
  • When renting in Mornington, you can request landlord permission for anchoring.

For locals unsure where to start, consult a Mornington Peninsula handyman or visit Bunnings Mornington for expert DIY advice.

Leave a comment

a dresser in green paint

What is the Difference Between a Dresser and a Dressing Table?

In the world of interior design, furniture terminology can often become a source of confusion. Two terms that are frequently mixed up are dresser and dressing table. While both may seem interchangeable—especially in casual conversation—they serve distinct purposes, offer different design aesthetics, and contribute differently to the functionality of your bedroom.

a dresser in green paint

If you’re in Mornington, Australia, and planning to refresh your bedroom layout, understanding the difference between a dresser and a dressing table is key to making informed decisions that elevate both style and practicality. Let’s get into it with Mornington Cabinet Makers.

🪞Dresser vs Dressing Table: A Quick Definition

Dresser
A dresser—also called a chest of drawers—is a multi-drawer piece of furniture primarily used for storing clothes and other personal items. Often placed against a wall, a dresser is known for its bulkier structure and horizontal form, typically accompanied by a mirror (though not always).

Dressing Table
A dressing table, on the other hand, is a smaller, more elegant piece, often associated with personal grooming and makeup application. It generally includes a mirror, a flat tabletop surface, and one or two small drawers or compartments.

🛠️Key Functional Differences

  • Storage Capacity
    • Dressers have deep, wide drawers ideal for clothes, linens, and bulkier items.
    • Dressing tables are designed for smaller items like jewellery, skincare products, and cosmetics.
  • Primary Use
    • A dresser is a storage workhorse.
    • A dressing table is more of a vanity and styling station.
  • Furniture Placement
    • Dressers often go against walls near wardrobes or in bedrooms with more space.
    • Dressing tables are typically placed near windows or in corners to take advantage of natural light—ideal for makeup application.

🖼️Design Aesthetics in Mornington Homes

In the laid-back coastal suburb of Mornington—known for its relaxed lifestyle and blend of beachy charm and modern elegance—furniture choices lean towards light wood finishes, Hamptons-inspired pieces, and a coastal-chic aesthetic.

  • A dresser in a Mornington home might be a wide oak piece with matte white finishes, seamlessly fitting into coastal interiors.
  • A dressing table could be a delicate, French-inspired setup with curved legs, brass knobs, and a vintage mirror.

Adding either piece can accentuate your room, but their appeal will differ based on the room’s design goals. For example, a small beachside bedroom in Mornington may benefit from a compact dressing table to maintain openness, while a modern home in Benton Square might prioritise a high-capacity dresser for utility.

🛋️Which One Should You Choose?

Your lifestyle and space constraints play a crucial role in your selection. Here are some factors to consider:

✅ Choose a Dresser If:

  • You need ample storage for folded clothes.
  • You want to maximize functionality in a single piece.
  • Your room has limited closet space.
  • You’re designing a shared bedroom where both form and function are key.

✅ Choose a Dressing Table If:

  • You want a dedicated beauty/grooming station.
  • You have plenty of wardrobe space for clothing storage.
  • You appreciate decorative aesthetics and elegance.
  • You want to add a feminine or vintage touch to the room.

📐Measurements & Space Planning

Another key point of differentiation lies in dimensions:

  • Dressers typically measure 75–100cm in height, 120–160cm in width, and 40–50cm in depth.
  • Dressing tables are usually lower, about 70–80cm in height, with widths ranging from 80–120cm.

For those living in Mornington apartments or townhouses, where square meterage is limited, this distinction matters. A slimline dressing table with wall-mounted mirror could save precious floor space while still offering functionality.

For professional work, just visit Mornington Cabinet Makers.

💡Local Style Tip: Mix and Match

Many Mornington interior stylists recommend blending both elements in larger bedrooms. A dresser can anchor the room with storage, while a dressing table creates a moment of personal luxury. Style your dresser with ceramic vases, rattan trays, or framed beach photography, and dress your vanity with eucalyptus in glass jars or a boucle stool for comfort.

🛍️Where to Shop in Mornington

Here are some local retailers and homeware spots to consider:

  • Early Settler Mornington – Great for both modern and vintage dressers.
  • Provincial Home Living – Ideal for French-style dressing tables.
  • Freedom Furniture Frankston – For sleek, contemporary designs.
  • Saltbox Home – Curated pieces with coastal flair.

Whether you’re in Mount Martha, Bentons Square, or Main Street Mornington, these stores offer locally relevant options that suit regional design preferences.

📸Styling Ideas for Each

Dresser Styling:

  • Top it with a round mirror, scented candles, books, or a tray with perfume bottles.
  • Use drawer dividers inside to organise socks, T-shirts, or accessories.

Dressing Table Styling:

  • Include a lighted vanity mirror, cosmetic organisers, and a jewellery stand.
  • Pair with a plush chair or stool in a light neutral to keep the area airy.

🧠Conclusion: Know Your Purpose

While both the dresser and the dressing table can complement your bedroom, they are not substitutes for one another. A dresser is a functional storage unit, essential in minimalist or small-space homes across Mornington. A dressing table, by contrast, serves a more decorative and personal use, often creating a boutique feel in the bedroom.

When planning your furniture purchases, ask yourself:

  • What’s my daily routine?
  • Do I need more storage or more personal space?
  • What aesthetic am I going for?

Then head to one of Mornington’s design-friendly stores and pick the piece that fits both your lifestyle and your style.

🔚Final Takeaway

🪞“A dresser is for what you wear. A dressing table is for who you are.” — A sentiment that captures the emotional and functional difference between the two.

Leave a comment

build its connected to ceiling

Should Built-Ins Go to the Ceiling? A Smart Design Decision for Mornington Homes

When designing or renovating a home in Mornington, Australia, homeowners often face a common yet critical question: Should built-ins go to the ceiling? While this may seem like a simple stylistic decision, it’s actually a nuanced choice that affects everything from aesthetic flow and spatial perception to functionality and resale value. With Mornington Cabinet Makers, we explore the benefits, trade-offs, and expert advice surrounding floor-to-ceiling built-in units—and why many Mornington homeowners are opting for this seamless design.

The Rise of Full-Height Built-Ins in Mornington

Mornington, with its beachside charm and contemporary coastal architecture, is seeing a strong trend toward bespoke built-in furniture. Whether it’s custom bookshelves in Mount Eliza or modern entertainment units in Safety Beach, full-height built-ins are fast becoming a hallmark of elevated interior design. This shift isn’t just about aesthetics—it’s about maximizing vertical space, especially in homes where square footage is at a premium.

In real estate listings and renovation portfolios across Mornington Peninsula, floor-to-ceiling built-ins are often highlighted as a premium feature. Why? Because they add functional elegance while reducing visual clutter—two essentials in today’s modern, minimalist interiors.

The Visual Argument: Built-Ins That Touch the Ceiling Look Bigger and Cleaner

One of the primary reasons designers recommend taking built-ins to the ceiling is visual continuity. By eliminating the gap between the top of the unit and the ceiling, you prevent the eye from stopping abruptly, which can make a room feel more open, taller, and cohesive.

Imagine walking into a lounge in Mount Martha with wall units that reach only 80% of the wall height. That unused space collects dust, feels disconnected, and visually “cuts” the room in two. Now imagine those same units extending seamlessly to the ceiling. The difference in perception is enormous—it feels custom, considered, and expansive.

Especially in Mornington’s mix of contemporary beach houses and modernist homes, where open-plan living is common, maintaining vertical continuity can enhance the flow between spaces.

Practical Gains: More Storage, Less Clutter

From a purely functional standpoint, the answer to Should built-ins go to the ceiling? is a resounding yes—if storage is a priority.

In Mornington homes where every square meter counts—whether it’s a compact townhouse in Baxter or a larger family home in Mount Eliza—floor-to-ceiling cabinetry offers unparalleled storage. Top shelves can be used for seasonal items, keepsakes, or overflow storage, reducing the need for external storage solutions and eliminating visual mess.

For families juggling school gear, sports equipment, and beach accessories, high built-ins are game-changers. And when done with custom joinery from local Mornington cabinet makers, you get smart internal configurations such as adjustable shelves, pull-out drawers, or hidden compartments that make everyday living smoother.

Mornington Real Estate Value: Why Built-In Height Matters

If you’re renovating with resale in mind, here’s a real estate tip: built-ins that go to the ceiling often translate to higher perceived value.

Buyers touring homes in suburbs like Mount Martha, Mornington, and Frankston South are increasingly discerning. Details like tailored built-ins that “fit” the home architecture signal care and quality—two things that influence buyer psychology and price willingness.

Even more so, full-height built-ins eliminate the buyer’s mental checklist of future upgrades, making your property stand out in competitive markets.

Style Versatility: Modern, Hamptons, or Coastal—Ceiling-High Built-Ins Work

Whether you’re leaning toward Hamptons-inspired joinery, a sleek modern aesthetic, or something more Scandi-coastal, built-ins that go to the ceiling are stylistically versatile.

In Mornington, where many homes embrace a relaxed coastal palette—think white cabinetry, timber accents, and soft greys—floor-to-ceiling designs work beautifully to ground the space while allowing styling freedom.

They also provide a clean backdrop for art, lighting, and accessories. Consider incorporating LED strip lighting, decorative cornices, or even ladder rails for a boutique-library feel.

Common Concerns and How to Address Them

Some homeowners may hesitate due to concerns such as accessibility or installation complexity. Let’s address those:

  • Can’t reach the top shelves? Use them for long-term storage or seasonal items. Invest in a sleek step ladder that tucks away neatly or consider a pull-down shelving mechanism.
  • Worried about ceiling variations in older homes? A skilled local joiner in Mornington can easily accommodate this with filler panels or custom scribing that hides any ceiling irregularities.
  • Concerned it may look too imposing in small rooms? Opt for light-colored finishes, mirrored backing, or open shelving at eye level to create airiness while retaining height.

Local Expertise: Built-In Specialists in Mornington

To achieve the best result, it’s worth consulting a Mornington Peninsula cabinet maker who understands the local styles and structural quirks. From sourcing sustainable timber to ensuring moisture resistance in coastal areas, a local expert ensures your built-ins are functional, durable, and tailored to your lifestyle.

Popular design firms and craftsmen around Mornington, Mount Eliza, and Dromana are now integrating built-ins into everything from kitchen pantries and laundry cabinetry to bedroom wardrobes and study nooks.

Sustainability and Materials: Making the Right Choice

Another layer to consider is sustainability. In Mornington, many homeowners are choosing eco-conscious materials like low-VOC paints, FSC-certified timber, and recycled laminate panels. When opting for ceiling-high cabinetry, using long-lasting, non-toxic materials becomes even more crucial, especially when installed across larger surfaces.

Ask your contractor about Australian-made panels and locally sourced hardware, which not only reduces environmental impact but also supports regional businesses.

For professional work, just visit Mornington Cabinet Makers.

Final Verdict: Should Built-Ins Go to the Ceiling?

Absolutely—especially in Mornington homes. The benefits of full-height built-ins include:

  • Maximized storage
  • Cleaner visual lines
  • Increased resale value
  • Seamless integration with modern design trends
  • Custom flexibility suited to your lifestyle

When properly executed, floor-to-ceiling built-ins don’t just add function—they become an architectural feature that enhances the feel and flow of your home.

Ready to Take Your Home to New Heights?

If you’re planning a home renovation or redesign in Mornington, now is the time to consider how built-ins can work smarter and look better. Consult with a local cabinetry specialist who can help design a solution that’s right for your space, your style, and your storage needs.

Because sometimes, the best way to expand your space—is to go up.

Leave a comment

-